Why the Trim System Stops Working
Outboard trim has gotten complicated with all the misinformation flying around about what actually fails and why. You’re at the dock — or worse, holding up the entire launch ramp while six boats idle behind you — and your motor refuses to budge up or down. Before you call a marine tech and drop $200 just to have someone walk over and flip a switch, let’s talk about what’s actually broken.
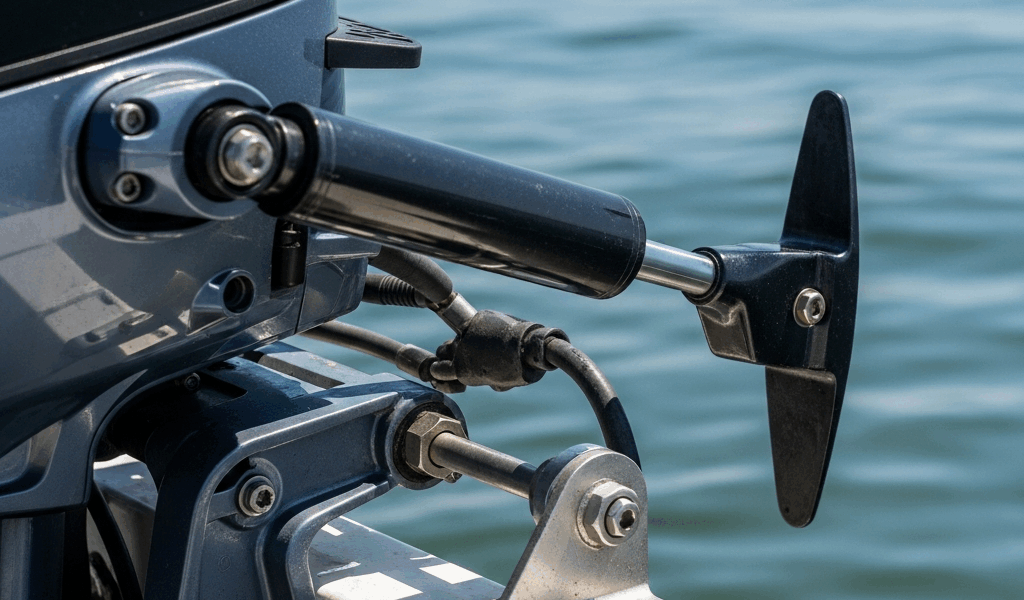
Most modern outboards run an electric motor that drives a hydraulic pump. That pump pressurizes fluid to push or retract a ram cylinder, which physically tilts the whole motor. Elegant when it works. When it doesn’t, failure usually falls into one of two buckets: electrical or hydraulic. Nine times out of ten, you don’t need special tools or a shop visit to fix it.
Start by paying attention to exactly what’s happening. Is it completely dead — no hum, no click, nothing? Or does it move one direction but not the other, groan without moving, or respond slowly? That one observation cuts your diagnosis time in half. It tells you whether you’re hunting a wiring problem or a fluid problem. Those are very different rabbit holes.
Check the Fuse and Relay First
Probably should have opened with this section, honestly. I once burned an hour troubleshooting a trim system on a Mercury 150 XL — checking switches, probing terminals, muttering — before noticing the 30-amp fuse had simply blown. Felt ridiculous. Don’t make my mistake.
The trim fuse usually lives near the battery or inside the main fuse block. Spend five seconds with your owner’s manual to find the exact spot. You’re looking for something labeled “trim” or “tilt,” typically rated 30 or 50 amps. Pop the fuse block cover. A fuse that’s blackened or scorched inside is dead — replace it with the exact same amperage rating. Not close. Exact.
Here’s the part people skip: if the replacement fuse blows again within a few uses, you don’t have a fuse problem. You have a short somewhere in the wiring harness. That’s a shop job. Chasing a short on your own at the ramp is a losing battle — take it to someone with a proper wiring diagram and a circuit tracer.
Fuse looks fine? Move to the relay. It’s a small black or gray box mounted near the fuse block — the intermediary that sends current from your switch to the motor. Quick test: find another relay on the boat with the same part number (many boats carry spares for bilge pumps or horns), swap it in temporarily, and press the trim switch. A solid click means power is flowing. No click, or a rapid click-click-click, means the relay is shot. Replacements run $15 to $40 depending on brand — Teleflex and Sierra both make generic versions that fit most applications.
Test the Trim Motor and Wiring
Frustrated by a trim motor that hummed but refused to move, I once grabbed a Fluke 115 multimeter and discovered the real culprit was a corroded connector the size of my thumbnail. The motor was fine. The lesson stuck hard: test before you replace anything.
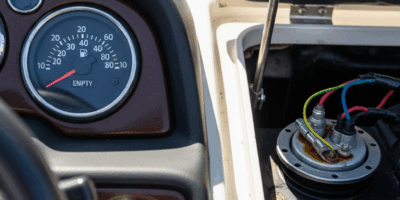
Find the trim motor terminals — usually mounted on the motor bracket or transom, connected to heavy-gauge wires. Set your multimeter to DC voltage. Key on, press the trim switch up and check for 12 volts at the terminals. Then press down and check again. No voltage in either direction? The problem is upstream — bad switch, broken wire, or the relay you already checked. Voltage present but the motor stays silent? The motor itself is probably seized or burned out.
No multimeter? Use the jump-wire test. With the key on, carefully touch a jumper wire from the positive battery terminal directly to one motor terminal, then the other. Motor spins? Power isn’t reaching it through the switch circuit. Motor doesn’t spin even when jumped directly? It’s dead.
Before ordering a new motor — they run $180 to $400 for most four-strokes — inspect the connectors first. Corroded terminals are especially nasty on saltwater boats. Look for white or green crusty buildup. Disconnect the wires, scrub the corrosion off with a wire brush or small file, reconnect firmly, and hit the terminals with a little dielectric grease. Sometimes that’s the whole fix. Seriously.
Also trace the harness along the motor bracket by hand. Feel for chafing against aluminum edges, pinch points where the bracket flexes, or low spots where water sits. A wire rubbed raw against the bracket will cause intermittent failures — the maddening kind that work fine at the dock and quit on the water.
Check Hydraulic Fluid and Look for Leaks
So the motor is running. You can hear it. But the outboard still won’t tilt. Now you’re in hydraulic territory — and this is where a lot of DIYers get frustrated because the fix isn’t always obvious.
Find the trim fluid reservoir — a cylindrical or rectangular tank mounted on the bracket behind the motor. Check the fluid level through the sight glass on the side, or unscrew the cap and dip a clean stick in. Most manufacturers specify Power Trim and Tilt fluid or Automatic Transmission Fluid. But get the exact spec from your manual before you pour anything. Yamaha specifies their own fluid. Mercury and Force typically run Dexron ATF. Wrong fluid damages seals, and seal replacements aren’t cheap.
Low fluid means you’re losing it somewhere. Scan the ram cylinder where the rod exits — that’s the most common leak point, right at the cap seal. Check every hose fitting where lines connect to the cylinder and pump. A weeping seal might only show as a faint slick or a few drops on the bracket below. Easy to miss if you’re not looking for it.
Level is low but hasn’t changed in three months of weekend use? Top it off with the correct fluid and keep going. Level drops noticeably between trips? That’s a seal kit or a new ram cylinder — and that’s a shop job. The internal pressure and seal geometry require a hydraulic press and specific tooling to get right. Guessing your way through it gets expensive fast.
Use Manual Override If You’re Stuck on the Water
Nothing works and you need to move the motor right now. That’s what the manual release valve is for — it bypasses the entire electrical and hydraulic system entirely and lets you tilt the motor by hand.
The manual release is a small valve screw, usually painted red or yellow, sitting at the base of the trim pump or on the cylinder itself. Location varies by brand — Yamaha hides it differently than Suzuki, so check your manual. Turn it counterclockwise a few turns with a wrench or flathead screwdriver. You’ll feel pressure release. The motor should now tilt freely by hand. It takes some muscle, but it works.
Get the motor to the position you need. Then — this part matters — retighten that valve clockwise before you start the engine. Running the motor with the manual valve open damages the pump. A lot of people learn this the hard way.
As for knowing when to DIY and when to call the shop: swap a fuse, relay, or corroded connector yourself — that takes an hour and costs almost nothing. Jump a wire to test the motor. Those are all fair game. If the motor itself is burned out, a seal is leaking, or a wire is chafed inside the harness somewhere you can’t reach, a marine technician with a bench-test setup and a wiring diagram will save you more money than they cost. That’s what makes systematic diagnosis endearing to us DIYers — knowing exactly where the line is.


Stay in the loop
Get the latest maritimematterstoday updates delivered to your inbox.