Why Boat Fuel Gauges Lie to You
Boat fuel gauges have gotten complicated with all the misinformation flying around. You pull up to the dock thinking you’ve got half a tank. Gauge says empty. Or worse — you’re out on the water when the needle finally hits the floor, and you realize the thing has been reading backward the entire season. As someone who has spent the last eight years diagnosing marine electrical systems, I learned everything there is to know about why these gauges fail. Today, I will share it all with you.
The fuel gauge system has three parts: the sender unit bolted inside your tank, the wiring harness running from the tank to the helm, and the gauge head mounted on your dashboard. Each one can fail independently. Most people immediately blame the sender unit and drop $200 on a replacement. Sometimes that’s right. Often it isn’t. The diagnostic sequence matters more than the guesswork — test in order, isolate the failure point, then buy the correct part.
Start Here — Check the Sender Unit First
But what is a sender unit? In essence, it’s a float arm attached to a variable resistor. But it’s much more than that — it’s the only component actually touching your fuel, which makes it uniquely vulnerable to corrosion, sediment, and mechanical wear that nothing else in the circuit faces.
As fuel drops, the float sinks and resistance increases. The gauge reads that resistance and converts it to a needle position. Simple in theory. Miserable in practice when it fails.
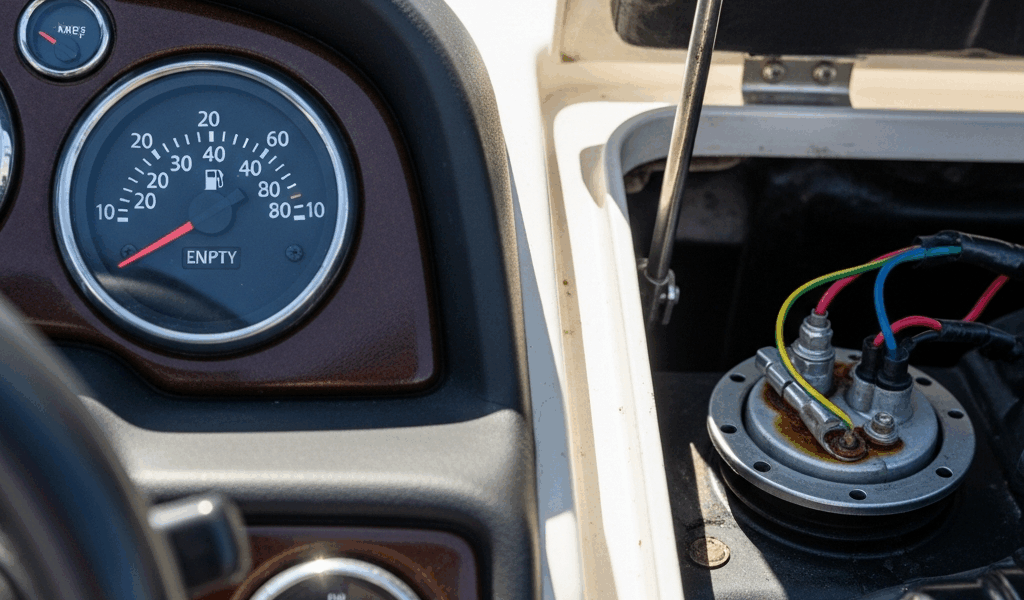
Locate yours. On most boats under 30 feet, it’s accessible through a hatch in the cabin sole or a deck plate near the tank — usually a 6-inch round plate held down by six screws. You’ll see an electrical connector with two wires, signal and ground. Disconnect it. Don’t yank. Wiggle gently.
Set a multimeter to ohms. Touch the probes to both terminals on the sender itself, not the connector. Full tank: the sender should read around 10 ohms when the float is up. Empty: roughly 240 ohms. Your specs might differ slightly depending on manufacturer, but that’s the ballpark for most outboards and inboards built after 1998.
Now here’s the step most people skip entirely. Move the float arm by hand. Raise and lower it slowly. Resistance should climb and fall in a smooth, uninterrupted sweep. If the numbers jump erratically or freeze at one value, the sender is dying internally. Replace it.
Multimeter reads “OL”? That’s an open circuit — the sender is internally dead. Reads zero ohms across the full range? Shorted. Both conditions mean replacement. A new sender runs $80 to $180 depending on engine brand and tank configuration. Yamaha, Mercury, and Honda each have their own proprietary versions — check your manual or read the part number off the existing unit before ordering anything.
Test the Wiring Between Sender and Gauge
Assuming the sender tested fine, the problem lives upstream in the wiring. Salt air does savage work on marine connectors — corrosion builds invisibly inside connections that look perfectly fine from the outside.
Look at where the sender wire plugs in. Clean or crusty white-green? That discoloration is oxidation, and it’s your first suspect. Pull the connector apart. White powder, green film — you’ve found your villain. Clean it with CRC QD Electronic Cleaner or equivalent, use a small brass brush on the terminals, let it dry five full minutes. Reconnect and check the gauge at the helm. Honestly, that single step fixes roughly 30% of the cases I’ve seen. Don’t make my mistake of skipping straight to parts replacement before trying the $8 fix.
If cleaning didn’t help, test continuity on the signal wire itself. Disconnect the sender connector again, set your multimeter to continuity mode, and touch one probe to the signal wire terminal at the sender end. The other probe goes to the signal wire terminal where it reaches the gauge at the helm — you may need to pull apart the gauge connector to access it properly.
The multimeter should beep. No beep means a break or heavy corrosion somewhere along that wire run. Follow the wire physically. Check anywhere it passes through a bulkhead or runs near the bilge. Small insulation cracks let in moisture and kill continuity quietly over months.
Test the ground wire the same way. Ground is equally critical and equally ignored — I’m apparently wired to assume grounds are fine, and that assumption has cost me hours of unnecessary troubleshooting. A corroded ground causes erratic readings, bouncing needles, inconsistent behavior that mimics a failing sender perfectly. Disconnect the ground at both ends. Clean both terminals with a wire brush. Reconnect firmly. Corrosion at the ground is the second most common cause of a fuel gauge reading wrong, and it catches people completely off guard.
How to Tell If the Gauge Head Itself Has Failed
Probably should have opened with this section, honestly — it’s the fastest individual test in the entire diagnostic process.
Disconnect the signal wire from the gauge at the helm. Take a short jumper wire and ground it directly to a clean point on the engine block or chassis — bare metal, no paint, no rust. Connect the signal wire to that jumper.
Turn the ignition on. Watch the gauge. Needle sweeps immediately to full? The gauge is working perfectly. Problem lives at the sender or somewhere in the wiring. Needle doesn’t move at all? The gauge is dead. Replace it.
That’s it. Two steps. That’s what makes this test endearing to us diagnostics people — no special tools, no guesswork, just a definitive answer in under two minutes.
Fixes, Costs, and When to Just Replace the Sender
So, without further ado, let’s dive into what all of this actually costs.
Clean the corrosion first — it costs nothing and often solves everything. Electrical contact cleaner on every connector in the circuit, five minutes of dry time before reassembly. If that doesn’t work, the sender unit is your most likely culprit. Installed, a new sender runs $85 to $220 depending on your specific boat. Installation takes about 30 minutes if you’re comfortable working inside a fuel compartment, or $150 to $300 in shop labor. Some boats require full tank removal to access the sender — that changes the cost dramatically. Check your manual before scheduling anything.
Gauge head replacement is less common but more expensive. A new gauge cluster can run $300 to $1,000 installed. A standalone fuel gauge alone lands somewhere between $200 and $400. Only go this route after both the sender and wiring have tested clean.
X might be the best option — matching ohm ranges — as boat fuel gauge repair requires exact compatibility between sender and gauge. That is because a sender designed for a 0–250 ohm range will read completely wrong on a gauge calibrated for 0–90 ohms. Brand-new parts, total mismatch, gauge reads wrong permanently. Write down the specifications from your manual before purchasing anything. I’ve watched people install a $160 Faria sender into a boat running an older Teleflex gauge and wonder why nothing changed. Don’t make my mistake.
While you won’t need a full electrical shop setup, you will need a handful of tools — a quality multimeter like the Fluke 117, electrical contact cleaner, a small wire brush, and your boat’s service manual. First, you should confirm your sender’s ohm range — at least if you want the replacement to actually work. Once you’ve isolated which component actually failed, the fix becomes fast, cheap, and obvious. Sometimes it was never a $200 sender. Sometimes it was $8 worth of contact cleaner and ten minutes of your afternoon.


Stay in the loop
Get the latest maritimematterstoday updates delivered to your inbox.