Why Your Bilge Pump Stopped Working
Bilge pump troubleshooting has gotten complicated with all the conflicting advice flying around. As someone who’s stood in a slowly flooding bilge at 6am with soaking socks and a dying flashlight, I learned everything there is to know about diagnosing these systems the hard way. Today, I will share it all with you.
A silent bilge pump is genuinely terrifying. Water pooling below your floorboards means rotting timber, corroding engine mounts, and an insurance adjuster who will absolutely not make your day better. But before you panic-order a new unit off Amazon, know this: four problems cause roughly 95% of all bilge pump failures.
A blown fuse. A dead float switch. A seized pump motor. Corroded wiring. That’s the whole list — at least if your boat is wired anything like a normal production vessel.
Here’s the part I wish someone had told me sooner. You can figure out which one killed your pump in under thirty minutes. You need a multimeter and a flashlight. Most repairs run under $50. Some cost nothing at all.
So, without further ado, let’s dive in.
Check the Fuse and Circuit First
Start here. Always.
Probably should have opened with this section, honestly — it’s the fastest win on the list and people skip it constantly. Your bilge pump draws power through a dedicated fuse or breaker, usually rated somewhere between 5A and 15A depending on pump size. On most production boats, that fuse lives inside the main electrical panel near the helm or tucked into a cabin locker.
Check the panel label first. If it says “bilge,” you’ve found it. If the labeling is illegible or just missing — welcome to used boat ownership — trace the red wire running up from the pump. It’ll lead you directly to the fuse block.
Pull the fuse out and look at it. Broken wire inside? Blackened element? That’s your problem. Match the amp rating exactly — don’t guess, don’t round up — and swap in a fresh fuse. A 10-pack of marine blade fuses costs about $4 at West Marine. Reinstall it, test the pump, done.
But if that fuse blows again within a day or two, stop replacing it. A fuse that keeps blowing is telling you something — specifically that the pump motor is pulling too much current, which usually means the motor itself is on its way out. Note it and move to the pump section below.
No multimeter? Visual inspection catches most blown fuses anyway. But if the fuse looks physically fine and the pump still won’t run, set your multimeter to DC voltage and probe both terminals of the fuse holder. You should see 12V on a standard 12V system, 24V on larger vessels. No reading means a broken connection somewhere upstream of the fuse. Zero volts at both terminals means the fuse is the issue regardless of how it looks. Either way, this diagnostic takes about sixty seconds.
Test the Float Switch Separately
But what is a float switch? In essence, it’s a position-sensitive trigger — a little mechanical sensor that tells your pump when water has risen high enough to need pumping. But it’s much more than that. It’s also, in my experience, the single most likely component to fail quietly without giving you any obvious warning.
Frustrated by a float switch that had jammed itself in the down position and refused to budge, I learned a simple trick from a charter captain up in Rockland, Maine — guy had been running wooden lobster boats since before I was born. His method: bypass the switch entirely and power the pump directly. This tells you immediately whether the pump motor itself actually works.
Locate the float switch first. It’s usually a cylindrical housing — roughly soup-can sized — mounted inside the bilge sump. Two wires run from it back toward your fuse panel and pump. Disconnect both wires at the switch itself.
Grab a short length of 14-gauge electrical wire. Strip both ends. Connect one end to your battery’s positive terminal — or the positive feed wire coming from your panel — and touch the other end directly to the pump’s positive terminal. Ground the pump negative to battery negative. Apply power. The pump should immediately spin up and start moving water.
If it does, your pump motor is fine. The float switch is your culprit.
If nothing happens, you’ve got a motor problem. Skip ahead.
Now test the float switch itself. Set your multimeter to ohms — resistance mode. The switch should read near-zero ohms when tilted downward and open to infinite resistance when tilted upward. Infinite in both positions means the internal contacts are stuck open. No change in resistance no matter how you angle it means the contacts have corroded solid. Either failure means replacement. A new float switch runs $15 to $40 depending on brand — the Attwood 4201-7 is what I run now, and it’s been solid.
Before you order anything though, check for debris. Float switches jam constantly in working bilges. Sediment, old fiberglass dust, leaves, the occasional mystery gunk — all of it finds its way into the mechanism. Pull the switch out — have a bucket under it, it will drip — and look inside the sump cavity. Scrub it with a rag, rinse everything with fresh water, and reinstall the switch. I’m apparently the bilge-cleaning type, and this method works for me while outright replacement never seems to stick long if the underlying sump is still full of debris. Don’t make my mistake. Clean first.
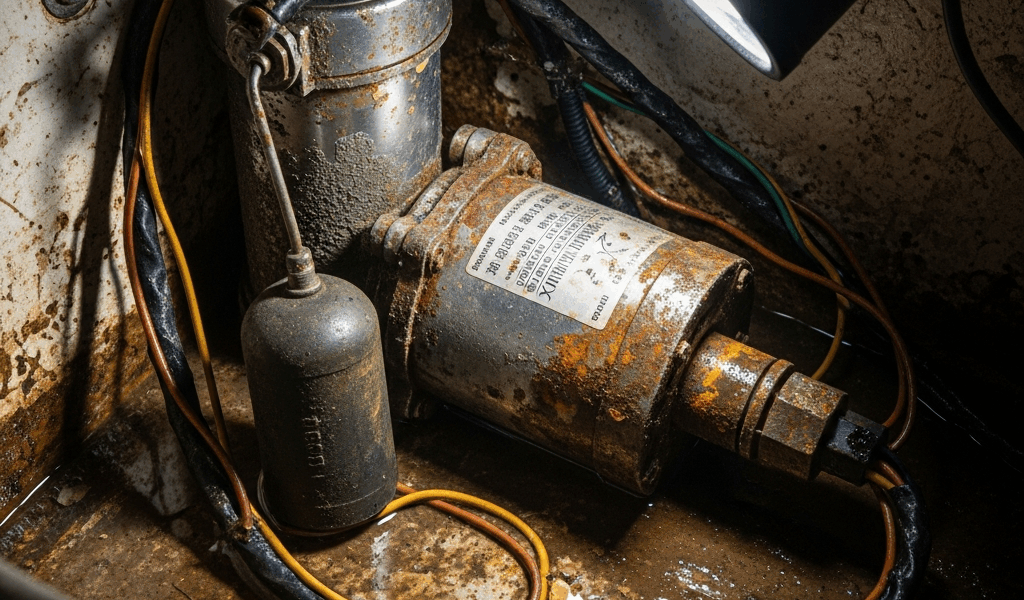
Inspect the Pump Motor and Impeller
Remove the pump housing from the bilge sump. Most models — Rule 1000s, Attwood Tsunami series, similar units — use four mounting bolts and come free in under two minutes. Check your specific manual for intake fitting details if it’s plumbed into a through-hull.
Spin the impeller by hand. That’s the fan-shaped wheel inside the pump body. It should rotate freely with zero resistance. If it won’t move at all, corrosion has seized the bearing or the motor shaft has welded itself in place with rust. That was probably a slow failure over two or three seasons.
Repair isn’t worth it here. A new 1000-GPH pump runs $25 to $80 depending on brand — Rule 1000 is around $35, the Attwood Tsunami T800 runs closer to $55. You’re not saving money nursing along a dead motor. Replace it.
If the impeller spins but feels sticky or gritty, hit it with a shot of PB Blaster and work it through ten full rotations. Mild surface rust on the shaft sometimes releases with that treatment alone. If it loosens up noticeably, flush the whole pump with fresh water and let it dry overnight before reinstalling.
Now do the bypass test again — connect the pump directly to 12V power using the method from the float switch section. Listen carefully. You should hear a distinct humming whir, and water should start moving through the outlet hose within a few seconds. That’s what healthy sounds like.
Hum with no water flow means the motor runs but something is blocking the impeller or the internal seal has failed. Pump replacement either way.
No hum at all means the motor is completely dead. Replacement time.
One more test worth running: with the pump powered on, probe the pump’s own positive and negative terminals with your multimeter set to DC voltage. You should read 12V right at the pump. Zero volts there — even with the pump powered from the panel — means the wiring between your panel and pump has failed. Jump to the wiring section.
Check Wiring and Connections for Corrosion
Bilge environments are brutal on electrical connections. Salt moisture, constant dampness, engine vibration — it’s a combination that eats through connectors faster than anywhere else on the boat. That’s what makes bilge wiring inspection so important for us boat owners who want the pump to actually work when it matters.
Check every connection point: pump terminals, float switch wires, fuse block terminals. Look for green or white powdery buildup on the connector pins. Even a thin film of corrosion creates enough resistance to kill voltage flow entirely — the fuse is fine, the motor is fine, and the pump still doesn’t run. Green corrosion inside a female connector is essentially guaranteed failure.
I’m apparently a DeoxIT evangelist at this point, and the D5 spray works for me while generic contact cleaners never seem to hold up more than one season. It’s about $10 a can at West Marine or on Amazon. Spray the corroded pins, scrub gently with a small brass brush, rinse with fresh water, let dry completely, and reconnect. This new idea of using proper contact cleaner took off several years later in the marine industry and eventually evolved into the standard that serious boat mechanics know and rely on today.
If a connector is cracked, melted, or so corroded that cleaning won’t save it, cut it off. Install a marine-grade heat-shrink butt connector — not the cheap blue automotive connectors from AutoZone, which corrode in bilge conditions within a season. Strip about half an inch of insulation from each wire, insert both ends into the connector, crimp with a proper ratcheting crimper, and hit the heat-shrink tubing with a heat gun until it seals tight. Under $5 per connector. Three minutes of work.
While you won’t need a full electrical rewire, you will need a handful of marine-grade materials if any wire runs look damaged or discolored along their length. Automotive wire is a false economy in bilge applications — it corrodes faster and creates the same failure you just finished fixing.
First, you should clean every connection before replacing anything — at least if you want to avoid spending money you didn’t need to spend. Marine-grade tinned wire might be the best option for any replacement runs, as bilge wiring requires corrosion resistance that standard wire simply can’t provide over time. That is because tinned copper holds up to moisture where bare copper oxidizes and fails within a couple of seasons.
Once connections are clean and everything is reconnected, test the pump again. Honestly, it’s humbling how often the whole “failure” was green corrosion on a connector that took four minutes and nothing to fix. Clean your bilge. Check your connections once a season. It’s not glamorous advice — but it’s the reason most pumps fail, and most people never figure that out.


Stay in the loop
Get the latest maritimematterstoday updates delivered to your inbox.