Pontoon Boat Winterization Checklist — Every Step Before Storage
Pontoon boat winterization has gotten complicated with all the conflicting advice flying around online — half of it wrong, a quarter of it incomplete. As someone who learned the hard way after cracking a water line fitting in my second year of ownership, I’ve since learned everything there is to know about putting a pontoon away correctly for the season. That one forgotten step — a live well I didn’t fully drain — cost me $340 at the marina come spring. My entire DIY winterization supply bill doesn’t hit that number. So now I tape a checklist to the inside of my garage door and work through it in order, every fall, before I touch a single thing on the boat. This covers everything I do on my 24-foot tritoon — engine, plumbing, battery, interior, all the stuff people forget until they’re staring at the damage in April.
Engine Winterization — The Most Critical Steps
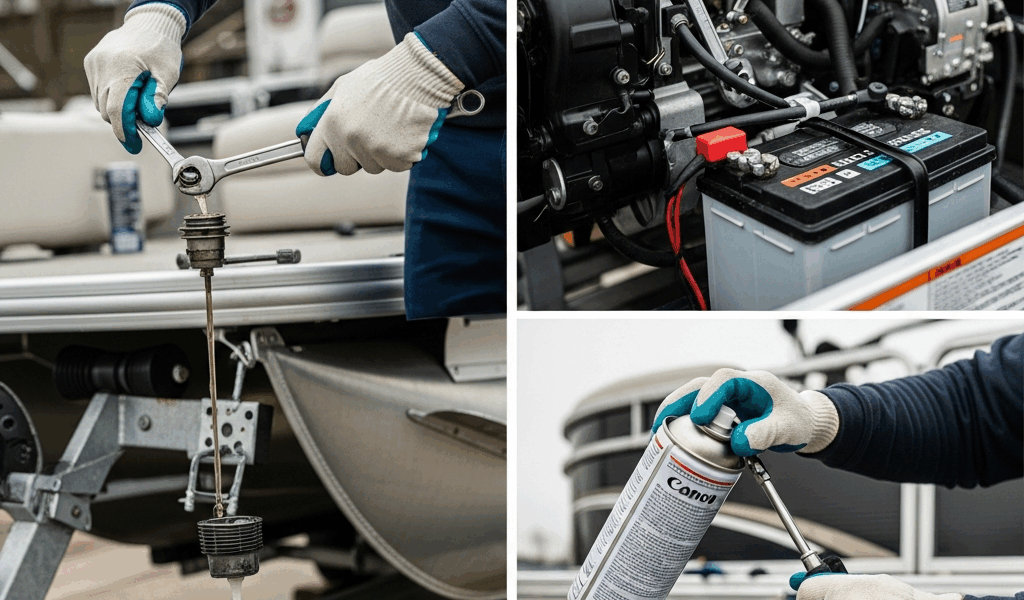
This is where the expensive mistakes happen. Get it wrong and you’re looking at a top-end rebuild or a seized lower unit come April. I run a Mercury 150 four-stroke outboard, so these steps lean toward outboards — but I’ll flag the sterndrive differences where they matter.
Fuel Stabilizer — Do This First
Add fuel stabilizer before you do anything else. The tank should still have a decent amount of fuel in it when you do. I use Star Tron Enzyme Fuel Treatment — a 1-ounce bottle treats up to 16 gallons, and a 4-ounce bottle runs about $9 at any big-box sporting goods store. Run the engine for 10 minutes after adding it. That’s how the treated fuel actually works its way through the entire fuel system. Don’t just dump it in a full tank and walk away. The stabilized fuel has to reach the injectors.
For outboards with a VST — vapor separator tank — I drain that too. Mercury four-strokes have one. Check your manual. Some engines have a dedicated drain screw on the VST; others need a fuel line disconnected at the engine and the primer bulb squeezed until dry.
I/O engines add another step: run stabilized fuel through the carburetor until the engine dies from fuel starvation. This purges raw fuel from the float bowl so it can’t varnish over four months. Killing the engine on purpose sounds wrong. It isn’t — it’s the correct procedure for carbureted sterndrives.
Fogging Oil — Don’t Skip This
Don’t make my mistake. I skipped this once, figured it probably wasn’t that important. It is. Now I buy a full can of CRC Heavy Duty Corrosion Inhibitor — the marine-grade fogging oil version, part number 06039 — every single fall. About $12 a can. With the engine still warm from running the stabilizer, pull the flame arrestor or air intake cover and spray a steady stream into the intake while the engine idles. It will smoke heavily. That’s normal. Shut it off mid-spray so the cylinders sit coated in oil all winter. This is what prevents cylinder wall corrosion during storage.
Four-stroke outboards also need an oil and filter change before storage — and I mean fall, not spring. Old oil carries combustion byproducts and acids that will work on engine internals all winter long if you leave them in there. I use Quicksilver 4-Stroke Marine Engine Oil 10W-30. A 6-quart kit with the filter runs around $45 and takes maybe 20 minutes to do.
Lower Unit Gear Lube
Drain and refill the lower unit gear lube every fall. No exceptions. If you pull the drain plug and the fluid comes out milky or foamy, you’ve got a water intrusion problem — usually a failed seal — that needs to be fixed before spring, not after. Fresh gear lube is cheap. A gear lube pump kit and a quart of Quicksilver High Performance Gear Lube runs about $22. Water sitting in the lower unit through a freeze cycle will crack the housing. That repair starts at $600.
Water System and Plumbing
Probably should have opened with this section, honestly. It’s the one most DIYers rush through — or skip half of — because there are more water-holding components on a pontoon than most people realize until they’re draining their third unexpected pocket of standing water.
Live Wells, Bilge, and Wash-Down Systems
Start by running all your pumps to empty what you can mechanically. Then pull out a wet/dry shop vac and get the remaining water out of every sump. The bilge on most pontoons sits low in the toon tubes — check both sides on a tritoon. A narrow crevice attachment gets into most of those spaces.
After vacuuming, blow compressed air through every water line fitting. I use a basic 3-gallon portable compressor and work through the inlet, outlet, and any crossover lines. Don’t skip the wash-down system — those half-inch lines trap water in every low spot and joint, and they’re easy to forget because you don’t use them that often.
RV Antifreeze — The Right Kind
But what is RV antifreeze, really? In essence, it’s propylene glycol — non-toxic, pink, and sold at Walmart for about $4 a gallon under the Camco brand. But it’s much more than just a cheap precaution. After blowing out the lines, I pour it into any line I can’t guarantee is fully dry. This is not automotive antifreeze — do not use that anywhere near a boat’s water system. The RV stuff doesn’t need to circulate. It just needs to sit in the low spots where residual water likes to collect — live well drain, bilge sump, any trap-style fitting.
The Ballast System — Most Forgotten Step
If your pontoon has a ballast system for wake enhancement, this is what gets skipped most often. The bladders and connecting hoses hold water — and they hold it in places you can’t always see. Inflate the bags fully with the pump, drain them completely, then blow compressed air through the fill lines. If your system uses weighted ballast bags rather than water bladders, pull them out entirely and store them inside. Freezing water inside a ballast bag will split the seams, and those bags aren’t cheap to replace.
Battery Removal and Storage
A marine battery left on the boat in an unheated garage or uncovered slip over winter will be dead — or close to it — by the time you want to launch in May. I know because I killed a two-year-old Optima Bluetop doing exactly that before I understood what cold storage actually does to a battery.
Disconnecting and Cleaning
Disconnect the negative terminal first, then the positive. Use a wire brush terminal cleaner — about $6 at any auto parts store — on both terminals and the battery posts before you put anything away. A light coat of CRC Battery Terminal Protector spray keeps corrosion from forming during the off-season. And if your boat has a battery switch, flip it to the off position even with the battery removed. It protects the switch contacts.
Trickle Charger and Storage Temperature
Store batteries somewhere that won’t drop below 32°F — an interior basement shelf is ideal. I use a NOCO Genius 5 smart charger, about $40, connected to each battery in float mode all winter. It won’t overcharge. It just keeps everything at full capacity. A properly maintained marine battery lasts 4 to 6 seasons. One left to discharge over winter might give you two before it stops holding a full charge. The math isn’t complicated.
Label your batteries with the installation date if they aren’t already marked. It removes all the guesswork when you’re staring at a battery in year three wondering whether to replace it or just recharge it.
Interior and Furniture Protection
The pontoon deck and furniture account for a significant chunk of the boat’s resale value. Twenty minutes of prep here prevents hundreds of dollars in UV and moisture damage — which is one of the better returns on time investment you’ll find in boat ownership.
Vinyl and Upholstery
Clean the vinyl before applying any protectant. Applying protectant over a dirty surface just seals the dirt in — which sounds obvious until you watch someone do exactly that. I use 303 Marine Aerospace Protectant after cleaning with Star Brite Ultimate Vinyl Clean. A 32-ounce bottle of 303 runs about $18 and covers every seat, the helm padding, and the bimini frame. It blocks UV and keeps vinyl from cracking during the off-season. Skip the Armor All — it uses petroleum distillates that apparently degrade marine vinyl over time. I’ve seen the results on boats stored next to mine. Not pretty.
Moisture Absorbers and Rodent Prevention
Toss three or four DampRid FG50T Moisture Absorbers — about $6 each at hardware stores — under the seats and in the storage compartments. Mold doesn’t wait until spring to start. It starts in October if the boat gets closed up with any residual moisture trapped inside. Swap them out halfway through winter if your storage area runs humid.
For rodent prevention, Irish Spring bar soap in mesh bags — one in every storage compartment, one under the helm. Sounds ridiculous. Works reliably. I also block the bilge exhaust port and any other opening larger than half an inch with steel wool before putting the cover on. That’s what makes this approach endearing to us DIY winterizers — it’s not expensive or complicated, just consistent.
Electronics — Pull Them If You Can
Chartplotters, VHF radios, stereo head units — they come off the helm and come inside for winter. The connectors get plugged with small rubber caps or wrapped in plastic. Modern electronics are more durable than older units, but four months of freeze-thaw cycles are still hard on display screens and connector pins. My Garmin ECHOMAP Ultra lives in the house from October to April. It cost $700. The ten minutes it takes to remove it is not a meaningful sacrifice.
Cover Options — Snap-On vs Shrink Wrap
A quality snap-on mooring cover for a 24-foot pontoon runs $350 to $600 and lasts 5 to 8 seasons with reasonable care. Shrink wrapping typically costs $12 to $18 per linear foot at a marina — on a 24-foot boat with a bimini, expect $350 to $500 per season. Shrink wrap might be the best option for outdoor storage, as severe winter weather requires a perfectly fitted seal. That is because no snap-on cover, regardless of price, matches shrink wrap’s ability to conform exactly to every curve of a rigged boat. I use a snap-on cover in a covered storage unit. If I were storing outdoors in Minnesota or Michigan, I’d pay for shrink wrap every single year without hesitation.
DIY vs Dealer Winterization — Cost Comparison
Dealers charge $300 to $600 for a standard pontoon winterization package depending on region, engine size, and what’s included. Some marinas in the Northeast charge up to $800 for full-service winterization with shrink wrap. Here’s what that actually buys you versus what DIY costs.
Typical DIY Supply Cost
- Fuel stabilizer (Star Tron 4 oz) — $9
- Fogging oil (CRC 06039) — $12
- Oil and filter kit (Quicksilver 10W-30, 6 qt) — $45
- Gear lube and pump kit — $22
- RV antifreeze, 1 gallon — $4
- 303 Marine Protectant, 32 oz — $18
- DampRid, 4 units — $24
- Battery maintainer (NOCO Genius 5) — $40 (one-time purchase)
- Snap-on cover (amortized over 6 seasons) — ~$75/year
Total recurring annual supply cost: approximately $134. Add the battery maintainer in year one and you’re at $174. That’s it.
What a Dealer Does That DIY Might Miss
A marina technician will sometimes catch things a DIYer walks past — a worn impeller housing, a lower unit seal showing early signs of failure, corroded connections at the engine harness plug. They’re looking at dozens of boats a week and recognize failure patterns fast. First, you should consider paying for dealer winterization at least once as a baseline inspection — at least if your boat is older or you haven’t had a professional look at it in two or three seasons. They’ll document what they found. You’ll know what to watch for going forward.
Time Estimate for DIY
My first solo winterization took close to four hours — a lot of manual checking, a lot of second-guessing. Now I finish the full checklist in two hours and fifteen minutes. The engine work runs the longest, about 45 minutes including the oil change and gear lube. If you’ve never done an outboard oil change before, budget extra time and watch your specific engine’s service video first. Mercury and Yamaha both have solid official tutorials on YouTube — worth watching once before you crack the drain plug.
This new routine took shape several years ago after that $340 spring repair, and it eventually evolved into the methodical checklist system I follow today. The $130 you save annually adds up fast. Over ten seasons, that’s $1,300 staying in your pocket — which almost covers a new lower unit if you ever actually need one. Do the checklist. Do it in order. Don’t skip the ballast system.


Stay in the loop
Get the latest maritimematterstoday updates delivered to your inbox.